Play with selenium
Published:
Introduction

Theo như bài báo mới nhất sáng nay của một hãng truyền thông uy tín hàng đầu nước Mỹ, thì Cristiano Ronaldo cùng rất nhiều người nổi tiếng khác trên khắp thế giới đang rất cần một mạng xã hội chuyên biệt để tương tác với người hâm mộ của họ thay vì dùng Facebook như hiện nay. Do nắm bắt được xu hướng đó, công ty mình đã tranh thủ giờ nghỉ trưa tạo ra một bản demo mạng xã hội mới với đầy đủ mọi tính năng cần thiết. Và thật bất ngờ là chỉ sau 5 phút mời chào đã có 1000 celebrities đồng ý dùng thử, nhưng vì họ quá bận rộn nên đã yêu cầu mình tạo giùm tài khoản đăng nhập với avatar và cover được sao chép từ tài khoản twitter.
Tất nhiên là có thể làm việc này thủ công nhưng điều đó tốn khá nhiều thời gian và có thể sẽ khiến những vị thương đế quyền năng của chúng ta đổi ý, thế nên chúng ta sẽ cần một cách tiếp tận nhanh hơn, hiệu quả hơn, ví dụ như tự động login vào Twitter rồi chuyển hướng đến trang cá nhân của Ronaldo, sau đó crawl avatar và cover về rồi upload lại lên dịch vụ mới của chúng ta. Cách tiếp cận mới này sẽ được thực hiện bằng Selenium (cụ thể là Selenium Webdriver), một công cụ rất hay mà mình sẽ giới thiệu với các bạn trong phạm vi bài viết này.
Basic
- Selenium (Selenium RC)
A testing framework invented by Jason Huggins
- WebDriver
WebDriver is a remote control interface invented by Simon Stewart that enables introspection and control of user agents[1]. It provides a platform- and language-neutral wire protocol as a way for out-of-process programs to remotely instruct the behavior of web browsers.
In computing, a user agent is any software, acting on behalf of a user, which “retrieves, renders and facilitates end-user interaction with Web content.
- Selenium WebDriver
Selenium WebDriver = Selenium + WebDriver[2][3]
Đại khái là nó trông như thế này

Và đây là cách WebDriver hoạt động
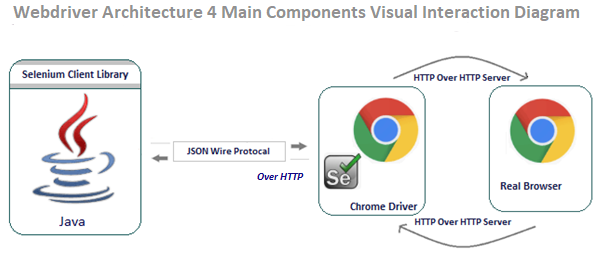
- Architecture
- Selenium Client library
- Đây là thư viện cung cấp cho bạn những câu lệnh và function cần thiết để gửi câu lệnh đến WebDriver ví dụ như click chuột, nhấn phím, chuyển hướng…
- Nếu bạn sử dụng
Gradlethì bạn có thể tải thư viện về bằng cách thêm đoạn code sau đây vào tập tinbuild.gradle.// https://mvnrepository.com/artifact/org.seleniumhq.selenium/selenium-java implementation group: 'org.seleniumhq.selenium', name: 'selenium-java', version: '3.141.59' - Còn nếu bạn chỉ sử dụng
Javathuần túy thì nhớ tải thư viện về và đặt nó trong đường dẫnclasspathnhé.
- JSON Wire Protocol
- Đây là một cơ chế trao đổi dữ liệu giữa client library (Java library) và webdriver(Chrome Driver). Client sẽ gửi đi HTTP request bao gồm serialized data với content type là
application/jsonvà kết quả trả về cũng được deserialization thànhJSONtương ứng[4].
- Đây là một cơ chế trao đổi dữ liệu giữa client library (Java library) và webdriver(Chrome Driver). Client sẽ gửi đi HTTP request bao gồm serialized data với content type là
- Browser Driver
- Cái này dùng để giao tiếp với browser thật (Chrome), nó nhận request từ
JSON Wire Protocolthông quaHTTP Serverrồi xử lý, và tiếp tục gửi request đã được xử lý đến browser (thông qua browser’s native support) cũng như trả lại response từ browser về cho client. - Trước đây với
Selenium RC(Selenium Remote Control), nếu bạn muốn điều khiển browser thìSelenium RCsẽ phải chèn thêm codeJavascriptvào browser nhưng cách này tỏ ra không hiệu quả và hiện đã bị thay thế bằng WebDriver[5]. Các loại WebDriver khác nhau nhưChromeDriver,GeckoDriverđược duy trì và phát triển bởi những nhà phát hành trình duyệt làGooglevàMozillacho phép bạn tương tác với browser hiệu quả hơn nhiều so với cách tiếp cận trước đó nên trong bài viết này mình sẽ sử dụngChromeDriverlàm mẫu.
- Cái này dùng để giao tiếp với browser thật (Chrome), nó nhận request từ
- Real Browser
- Browser nhận request từ WebDriver rồi thực thi. Cửa sổ trình duyệt sẽ bật lên (hoặc chạy ở
headless mode) và thực hiện mọi thao tác được bạn chỉ định như đi đến site X, click vào button Y…
- Browser nhận request từ WebDriver rồi thực thi. Cửa sổ trình duyệt sẽ bật lên (hoặc chạy ở
- Bonus thêm cái ảnh cho dễ hình dung[6]

- Selenium Client library
Prerequisites
Để sử dụng được Selenium cần cài đặt tương đối nhiều package như mình có liệt kê ở script dưới đây. Các bạn chỉ cần copy vào terminal là chạy được (Mình đã chạy thành công trên Ubuntu 20.04).
  # Install dependencies.

  sudo apt update
  sudo apt install -y unzip

  # https://www.baeldung.com/java-headless-mode
  sudo apt install -y openjdk-8-jre-headless

  # X virtual framebuffer is an in-memory display server for UNIX-like operating system that enables you to run graphical applications without a display.
  # It allow chrome web driver run in headless mode.
  sudo apt install -y xvfb

  # Allow chrome webdriver control input device like mouse and keyboard
  sudo apt install -y libxi6
  # Allow chrome webdriver set it own configure
  sudo apt install -y libgconf-2-4

  # json and xml processor tools
  sudo apt install python3-pip jq
  pip3 install xq

  LATEST_CHROME_DRIVER_VERSION=`curl -sS https://chromedriver.storage.googleapis.com/LATEST_RELEASE`
  LATEST_SELENIUM_STANDALONE_JAR=`curl https://selenium-release.storage.googleapis.com | xq | jq `last(.ListBucketResult | .Contents | .[] | .Key | select(test(".*selenium-server-standalone.*.jar")))`

  # install Google Chrome
  wget https://dl.google.com/linux/direct/google-chrome-stable_current_amd64.deb
  sudo dpkg -i google-chrome-stable_current_amd64.deb

  # Install ChromeDriver.
  wget -N https://chromedriver.storage.googleapis.com/$LATEST_CHROME_DRIVER_VERSION/chromedriver_linux64.zip -P ~/
  unzip ~/chromedriver_linux64.zip -d ~/
  rm ~/chromedriver_linux64.zip
  sudo mv -f ~/chromedriver /usr/local/bin/chromedriver
  sudo chown root:root /usr/local/bin/chromedriver
  sudo chmod 0755 /usr/local/bin/chromedriver

  # Install Selenium server (not required on local machine)
  wget -N https://selenium-release.storage.googleapis.com/$LATEST_SELENIUM_STANDALONE_JAR -P ~/
  sudo mv -f ~/selenium-server-standalone-$SELENIUM_STANDALONE_VERSION.jar /usr/local/bin/selenium-server-standalone.jar
  sudo chown root:root /usr/local/bin/selenium-server-standalone.jar
  sudo chmod 0755 /usr/local/bin/selenium-server-standalone.jar
Có câu lệnh nào bạn không hiểu thì đặt câu hỏi cho mình ở dưới nhé.
Automation
Bây giờ là lúc dùng những kiến thức đã học để giải quyết bài toán được đưa ra ở đầu bài viết sử dụng Java và Selenium.
- Việc đầu tiên cần làm là khởi tạo
ChromeDriver, trái tim củaSelenium.// Phải chỉ ra đường dẫn đến tập tin thực thi của chromedriver nha, không là chẳng biết ở đâu mà tìm luôn đấy. System.setProperty("webdriver.chrome.driver", "/usr/bin/chromedriver"); ChromeOptions chromeOptions = new ChromeOptions(); // mở trình duyệt chromeOptions.addArguments("--start-maximized"); // chạy ngầm chromeOptions.addArguments("--headless"); WebDriver driver = new ChromeDriver(chromeOptions); - Tiếp theo thì để crawl được avatar và background của các
celebritiesthì cần đăng nhập vàoTwittertrước đúng không?
Để nhập được username, password cũng như click vào button
Log Inthì bạn cần cho webdriver biết vị trí của những thành phần này trên trình duyệt. Và thật may mắn là thư việnselenium-javacủa chúng ta đã hỗ trợ điều này rất tốt với hàng loạt phương thức khác nhau như sử dụngCSS selector,Xpath,Attribute Name… Thế nên là cách nào dễ thì chúng ta làm cách đó.
  String twitterUserNamePath = "session[username_or_email]";
  String twitterPasswordPath = "session[password]";
  String twitterLoginPath = "/html/body/div/div/div/div[2]/main/div/div/div[2]/form/div/div[3]/div";

  driver.get("http://www.twitter.com/login");

  // Nghỉ ngơi tí đợi website load không thì ăn ngay quả bug NO SUCH ELEMENT.
  TimeUnit.SECONDS.sleep(1);

  driver.findElement(By.name(twitterUserNamePath)).sendKeys("username");
  driver.findElement(By.name(twitterPasswordPath)).sendKeys("password");
  driver.findElement(By.xpath(twitterLoginPath)).click();

  TimeUnit.SECONDS.sleep(2);
Ở đoạn code phía trên mình chọn sử dụng
attribute's namecho đỡ tốn không gian nhưng đối với những tag không cónamethì bạn có thể cân nhắc những lựa chọn sau đây.
Và tiếp tục với cách thức như trên thì cuối cùng chúng ta thu được kết quả này

Final note
- Trông có vẻ đơn giản tuy nhiên luôn có những bài toán rắc rối hơn mà có thể bạn sẽ gặp phải như sau:
- Có image upload mất 10s, có image upload chỉ mất 1s, làm sao để vừa tối ưu thời gian vừa đảm bảo image đã được upload thành công?
- Thật may mắn là thư viện có hỗ trợ các phương thức như là
waitElementToBeActionable().
- Thật may mắn là thư viện có hỗ trợ các phương thức như là
- Đối với những element bị ẩn (
display:none) thì webdriver sẽ ném ra ngoại lệNo such element, vậy làm thế nào để webdriver có thể focus vào element đó?- Đáp án là bạn cần phải chèn thêm
scriptđể làm cho element đó visible thì mới có thể thao tác tiếp được.
- Đáp án là bạn cần phải chèn thêm
- Cuối cùng là sau khi xong xuôi hết mọi thứ thì nhớ tắt webdriver đi nhé, không thì phải tải ram trên mạng xuống để dùng đó.
driver.quit();
- Có image upload mất 10s, có image upload chỉ mất 1s, làm sao để vừa tối ưu thời gian vừa đảm bảo image đã được upload thành công?
- Source code
Reference
- https://www.w3.org/TR/webdriver/
- https://www.quora.com/What-is-the-difference-between-Selenium-RC-and-Selenium-web-driver
- https://www.scientecheasy.com/2020/07/selenium-webdriver-architecture.html
- https://stackoverflow.com/questions/54382080/what-is-the-difference-between-protocol-and-json-wire-protocol
- https://www.h2kinfosys.com/blog/difference-selenium-rc-webdriver
- https://www.quora.com/How-does-the-Selenium-WebDriver-work/answer/Alex-Siminiuc-2
Terminology
- https://medium.com/swlh/lets-take-a-look-at-selenium-d8640539ee23#619d
- https://www.scientecheasy.com/2020/07/selenium-webdriver-architecture.html/
Thank for reading :blush:.